

Friday 24 February 2017
NEW WEBSITE LIVE!
Hello creative souls! My new website is now live and you are warmly invited to come and visit and browse. The shop has some lovely kits and patterns available and there is information about classes and courses. Click here to enter and I'll see you there!

Friday 11 November 2016
Christmas Embroidery Workshops

I would like to invite all you creative souls to a Christmas Embroidery Workshop. If you read that and though "I'm not a creative soul!" I say "ha! you just don't know it yet". I have been busy stitching up and designing some lovely Christmas decorations and keeping the designs deliberately easy and quick to make. If you are local to Lane Cove in Sydney I would love to see you.
Contact me to make a booking:
Do you love exquisite hand made decorations, but you think they’re too difficult to make or too expensive to buy from exclusive stores? Imagine your Christmas tree embellished with your own hand made gems that will be admired by guests and family and treasured as personal heirlooms for years to come. More meaningful, authentic and personal than any shop bought items.
Many hand made things look complicated to make until you are shown how to do it in clear and simple steps.
I invite you to join me in a series of workshops designed to produce quick and stunning Christmas decorations for you to keep.
Workshops held at Centrehouse, Longueville Rd, Lane Cove, Sydney.
Strictly only 10 spots per class.
Materials provided will make 12 decorations and are included in the cost of the class.
Materials provided will make 12 decorations and are included in the cost of the class.
Saturday 26th November 10-1pm
Sunday 27th November 10-1pm
Sunday 27th November 10-1pm
Monday 5th December 6-9pm
$87 per student.
Contact Kasia via the contact page to secure your booking.

Monday 29 August 2016
Ain't nobody got time for embroidery! Unless...

We might not know each other personally, but if I were to guess, I’d feel quite confident in assuming that you DON’T have time for spending hours in front of the fireplace while blissfully relaxed over an embroidery pattern. (Actually if you do, please email me and tell me more about yourself. I want to know how you do it.) Us creatives spend a lot of time fantasising about images of ourselves being creative gods or goddesses in a state of bliss, producing masses of beautiful stuff. But in reality most of us are holding a vacuum cleaner in our hand and not an embroidery needle. Or the washing basket, a child, a grandchild, or a myriad of other commitments we all have regardless of our stage in life. I have friends who are retired yet too busy for pursuing creative leisure. We can easily agree, I think, that most of us would say we have no time for something like embroidery (despite that above mentioned fantasy). But what if we do and we just don’t know it? What if there is time and space and we just don’t notice it because we’re so busy being busy? Imagine not noticing that you have another bank account that you forgot about or because you’ve been focused on using another one and you totally missed that you have a spare $10,000. You’d never do that with money, but we do this with our time ALL THE TIME (pun intended). We budget our money but we rarely budget our time. We keep track of our spending but we don’t really keep track of where we spend our time.
If you’ve fantasised about being that creative god/goddess
read on.. there is time.

I’ve tracked my time twice over the last year in two different
ways. One was to firstly list all the things that were most important in my
life and then track over a period of a month what I’m spending most of my time
on and see if it matches what I said was super important to me. (This was
following reading the book “The Power Of Full Potential). Boy was I surprised. It was a bit like saying
that eating healthy food was important to me and then finding out that I’ve
been living on popcorn and soda for a month. The second time I tracked my time
was when I was curious about how much time I spend doing housework and using my
car. It FELT like I was forever cleaning and driving, but I wanted to be sure.
So I got a time tracker app and mapped my time. Yup, I was cleaning and
driving. I did way more cleaning than I wanted but the driving wasn’t as bad as
I thought.
Why am I telling you all this? What the heck does it have to
do with embroidery and finding time for it? Two things in fact.
Firstly, if you have creative desire and your heart sings
when you see Pinterest images of tactile crewel embroideries that your hands
are busting to get into, and you DON’T make time for that desire you will be
unfulfilled and you’ll feel that in other parts of your life. It might make
itself known as frustration at your kids, or not liking how you look or
whatever. A denial of our creative urges is unhealthy and the urges don’t go
away just because we’re busy, we just end up getting frustrated without
realising that we feel in some way unfulfilled. There was a whole book written
about this called “War Of Art. Don’t fight against your creative desires, you
won’t win.
Secondly, time is not some fixed thing that is out of our
control. It really isn’t. You’ve no doubt heard of people whose lives have
changed by some tragedy or some news of their health and suddenly they find 6
“spare” hours per week for yoga classes and meditation. The change comes about
from a shift in perspective and a slight change in the direction of our focus.

If you’ve felt that you’d love to do some needle work, relax
over a lovely design and create something beautiful with your hands, you CAN
find time and you deserve to use your time for yourself in this way. You don’t
need to reshuffle your entire schedule. It is more about becoming conscious and
observing where you’re spending your time and what you’re doing with it. Then
becoming conscious about what it is that you would actually prefer to be doing.
Then slowly making choices in the preferred direction. Just small choices every
day will be enough to allow you to reclaim more time for what you want to do. I
did this after I tracked my cleaning/driving time. I started asking the kids
more frequently to help out and stopped worrying that things weren’t done to my
standards. I also turned a blind eye to a few messes here and there. You see,
we get so busy in life that we forget to pay attention to what actually makes
us happy. I can tell you that on my happiness scale sitting down to embroider
in a messy lounge room is way better than spending that time cleaning the
lounge room. I learned that my life isn’t out of control if the clean washing
sits in the basket for 3 days after it came off the line.
Don’t deny yourself your creative calling. If your hands and
heart are drawn to embroidery follow them and give them time. You will be
rewarded.

Lastly if you’ve read all this and are busting to jump into
a project but don’t know what to start, I recommend something small. Small is
good! Small should never be dismissed. A project that will take you 15 minutes
a day over a couple of weeks or even just a week will bring you enough of a
sparkle to make you smile at your own talent. If you’d like an idea jump onto Mary
Corbett’s site www.needlenthread.com.
I have been a fan of her tutorials for years and highly recommend her site as a
source for learning. Have a look at border stitches and choose one to do around
your favourite tea towel. Just for a little project that you can start and
finish and see the result at the end.
And, if you’ve read this far, then you must be busting to
get your hands into something. I will be running one or two free embroidery
workshops in September, in Lane Cove (NSW Australia), depending on demand. Reply to this email and let me
know if you’re interested and let me know how much (if any) time you have for
creativity. Would you like to have more time? Or is it that you lack
inspiration or ideas? In my workshop you can learn a few new stitches, but more
importantly I’ll give you ideas on what to do and get you inspired to stitch
and enjoy and relax and see the beautiful things that your hands can make!
I look forward to hearing from you.
With love and creative freedom.
Kasia J

Tuesday 2 August 2016
A Dress Transformed... With Only Three Stitches And A Moment Of Time.
When you see a large piece of fabric, be it a coat, table cloth or big cushion covered in embroidery do you immediately think: "wow that must have taken for ever!" Well sometimes it does. Some intricate and complex embroideries do indeed take a long time, but not all. It is quite possible to achieve a beautiful effect without all that much work. It all depends on what type of stitch you choose, what design you choose and what colours you choose.


For this dress the most important factors I took into consideration were:
 A word about the herringbone stitch. The link above will take you to Mary Corbett's site where I send all my students for improving technical skills. This is a gerat stitch to get to know because it will serve you as a filling stitch in so many ways. When you're practising it, try going in curves, filling outlines areas and tightening the stitches. Get your sampler out and practice. You'll see that Mary makes the stitches quite far apart but you can play with the distances and achieve all sorts of effects.
I will soon be posting a lesson on how to do flowers like these in a herringbone stitch.
The main message here is this; ask yourself what value you will get out of a chosen project. Do not jump into something just because it looks amazing on Pinterest. Will you use it, wear it, display it in your home? We don't spend anywhere near enough time questioning our motivations before going ahead with all kinds of projects. And thus we waste time later and waste materials when we don't finish things. Keep things simple for yourself, be realistic with your time and use your favourite colours.
With love and creative freedom!
Kasia :)
P.S. Do you embroider your clothes? What do you love about clothes decorated in embroidery? Please leave a comment below, I'd love to hear from you!

I'd like to share this example of a dress I finished recently because it did not take long at all. In total about 2 weeks of stitching about half an hour each night and a little more on weekends, but by no means hours and hours on end. So that's about 8-10 hours. The time is relative here. This may seem like a long time to some or like a very quick project to others. It depends on how much time you have available AND... most importantly what value you would get out of a project like this.

It's not enough to count the number of hours and decide if you would or wouldn't tackle a project. You really have to ask yourself what you would get out of it. You could easily spend 8-10 hours (or more!) embroidering a table runner that only comes out at christmas time and no one even notices your handi work! Or you could choose somehting that takes less time but has a greater impact in your life. For me, I love clothes. Wearing this dress brings me so much joy. It's unique, no one else has one like this and I've put on it my favourite colour combinations. So to me, the 8-10 hours spent on it brought great value. A big return on time invested.
I urge you to look for value in all your chosen projects. Ask yourself (in Marie Kondo style) "will this bring me joy?"
For this dress the most important factors I took into consideration were:
- Colours. Colours can create 100 x more impact than some fancy embroidery stitch. Choose your favourites, go for big contrasts, popping colours, light threads on dark fabrics.
- Easy stitches. I like to stitch quickly and not labour over 1000 tiny french knotts to cover an area of a coin in 2 hours. For the dress I used the herringbone stitch for all the flowers, the stem stitch for all the line work and the leaf stitch for all the leaves. That's it.

I will soon be posting a lesson on how to do flowers like these in a herringbone stitch.
The main message here is this; ask yourself what value you will get out of a chosen project. Do not jump into something just because it looks amazing on Pinterest. Will you use it, wear it, display it in your home? We don't spend anywhere near enough time questioning our motivations before going ahead with all kinds of projects. And thus we waste time later and waste materials when we don't finish things. Keep things simple for yourself, be realistic with your time and use your favourite colours.
With love and creative freedom!
Kasia :)
P.S. Do you embroider your clothes? What do you love about clothes decorated in embroidery? Please leave a comment below, I'd love to hear from you!
How To Embroider Without Relying On Patience.
I get it. You’re impatient. You sit there with your embroidery and
you’re watching as your needle goes in and out making tiny half centimetre
stitches. You look at the design drawn on your fabric, it looks 100 times
bigger than what you’ve embroidered so far. To stitch a few centimetres takes
what seems like FOR EVER. Your thread has become tangled, you’ve just realised
that some fabric got caught under your hoop and you’ve stitched it together
with the stretched fabric. You untangle the thread, drop your needle on the
carpet, can’t find it. It’s so frustrating! Who the heck said that embroidery
was relaxing and joyful!? That’s not joy!


If you’ve experienced this then you could easily be led to believe that
patience is the number one requirement for embroidery. So you throw your arms
up and say “I’m too impatient for embroidery!” But let’s hold on a moment, do
you know the definition of being patient? It means:
“having the capacity to accept or tolerate problems
or suffering without becoming annoyed or anxious.”
What kind of problems and
anxiety are we experiencing while embroidering?! Agonising pain and inner
turmoil? Gnashing of teeth and eternal suffering? No; tangled threads, dropped
needles, running out of materials, not knowing how to do a stitch and taking on
a massive project when you don’t have a year to devote to it. Those are pretty
much the biggest “problems” for embroiderers. And each one has an easy solution.

·
Tangled
threads: stitch slower. When you pull your thread through, pull it out slowly.
Especially if it’s very long. It’s only the long threads that have a tendency
to get tangled. Tangles are frustrating but stitching slower will eliminate
that for you. When you pull your threads through too quickly you are trying to
save time but end up in a mess and then waste more time. So this is counterproductive.
Like in other areas of life, when we rush we create problems.
·
Dropped
needles: prepare. If you’re going to embroider in a park, bring spare needles.
Don’t waste your time looking for a needle in the grass. If you’re sat at a
table have a pincushion ready and always use it. And I recommend getting a
magnetic pin finder from the haberdashery shop and if you drop a needle on the
carpet it’s so much easier to wave a magnet around than it is trying to use
your eyes.
·
Running
out of materials: again, preparation. Running out of thread should not
interfere with your project. Spend a few minutes thinking about how much thread
and in what colours you will need and buy just a little more. Maybe just one
extra skein in each colour. The extra minutes you spend planning your thread
usage will save you oodles of time later. And it will save you from this: “I’ve
run out of thread, I’ll just put this project aside until the next time I’m at
the embroidery shop…” (one year later…)
·
Not
knowing a stitch: this CAN be frustrating, if you let it. There are many videos
available online showing you how to do a stitch and I always direct my students
to this absolute gem of an embroidery encyclopaedia www.needlenthread.com. Check it out,
Mary Corbett is amazing at giving detailed instructions. I would keep this site
as the only one you’ll ever need when it comes to technical skills in
needlework. Worst case scenario, if you truly are having trouble with a stitch,
swap for something else. Do not allow a silly stitch to ruin your piece of art. It’s
a stitch! It’s not your boss, YOU are the boss! If you just can’t master the
leaf stitch but have a leaf shape to fill in, by all means have a look at other
stitches on www.needlenthread.com or
fill it in with a satin stitch or even tight running stitches. There are no
rules.
·
Project
is too big: your eyes are bigger than your belly. If you’ve taken on a
reproduction of a 17th century 3m x 4m French tapestry, chances are
you will indeed become ‘impatient’ (pain and suffering included). But even if
your project isn’t THAT big, if it’s not suited to how much time you have on
your hands or your skill level then it may as well be a 17th century
French tapestry. Several years ago I started a world map. It was going to be a
wall hanging above my bed. I finished Africa and Madagascar before I thought: “Why
do I want a world map?” And I had no answer. So, choose projects according to
your available time, interest and skill level. Seriously. Be brutal and question your
inner excited crafter that’s shouting: “This fully embroidered bed canopy is
going to be sooo amazing!!!

The conclusions
here are simple. Get real! Choose small but doable projects, you will get so
much more satisfaction from finishing something small than from starting
something you can’t do. Prepare, prepare, prepare. It only takes a few minutes
to think about your materials, or where you’ll be sitting or looking up a
stitch and practising it on your sampler. Or just ditching it and using your
own invented stitch. Our main aim is to make something beautiful with our hands
and see it finished because this brings joy. So drop the idea that you need patience for embroidery. Follow your own flow,
skill level and time and you will hear people say to you: “Wow, you are so
patient to be able to do that.”
Do you consider
yourself impatient when it comes to embroidery? Have you quit projects in the
past because you became “impatient”?
I’d love to hear
from you about your own frustrations with impatience in embroidery. Please leave a comment below!
With love and
creative freedom.
Kasia J
Tuesday 26 July 2016
Are you the queen of unfinished embroidery projects?
About a year ago, in a rushed effort to find the charger for my mobile, searching everywhere, I stuck my head under my bed in case it got kicked under there the night before. I saw a big IKEA box which stirred my curiosity. I couldn’t remember why that was there and what was in it. Distracted from the charger I pulled it out and immediately that feeling of disappointment washed over me. About half a dozen unfinished embroidery and tapestry projects neatly folded waiting to be loved again. I felt immediate self-judgement and a sense of failure.

As artists and crafters we are surrounded by unfinished projects. This is normal but we torture ourselves with the guilt and we dive into new projects to fix our previously perceived failures. I want to show you how you can effortlessly eliminate the disappointment and guilt which also serves as the thing that holds you back from creative freedom. It’s how I got through not only that IKEA box but have since cleared out every unfinished craft project. But not in the way you might think.
Firstly understand that our minds can’t leave open loops alone. By nature we are drawn to closure and results. Having open loops leaves us with anxious niggling thoughts at the back of our minds. And when we add a belief that we ‘should’ have done something then that niggling thought also turns into guilt.
Our guilt and anxiety are not there because the project is “unfinished” it’s because we’ve classified it as “unfinished” and thus a “failure”. We tell ourselves a failure story every time we see our bags of half-done craft, just like I did in that moment of seeing the contents of that box. The half-done craft, by itself, doesn’t mean anything. We are the ones that add the meaning to it. You might call yourself the “queen of unfinished craft projects” or you might say “I’m really good at starting but really bad at finishing my craft projects” but that’s just a chosen perception.
Our perception of what a “finished product” is, can often be a little harsh leaving us with guilt, disappointment and a sense of failure. We have expectations of our craft projects to be complete, all edges perfectly finished off and hanging on the wall, looking beautiful. When they’re not that we become self-critical. You do not have to be a victim of your own creative failure stories. You can choose to reclassify your craft projects and ‘finish’ them on your own terms. Here’s an easy exercise for a quick wrap up of what’s lurking in your cupboard (or under your bed):
Take out all your projects right now, lay them out on the floor or table and classify them using some examples below.
You see, you don’t need to go ahead and actually finish every single project that’s hidden under the bed, make it amazing, hang it on the wall, mount it on mahogany dowels. You don’t need to set aside days, weeks and months of work to finish every single project. This is YOUR creativity on YOUR terms and it should bring you joy. Living with hidden piles all over the house is not joy. This exercise is all about closing those open loops and laying your guilt and anxiety to rest. Creativity is a full process of experiments, changed minds, failures and successes. You choose what you call your projects and that shapes your mindset for your future projects.
 My sampler. Stitched up of lots of bits and pieces of experiments and unfinished projects.
Just be mindful; it’s not enough to give your projects names of “experiment”, “charity donation” and “sampler” and then put them all back into the dark cupboard! Haha! You do actually have to put them to use like in the examples above. It’s about moving your projects forward, creating momentum and not remaining in stasis. It’s also about being kind to yourself about how you judge your projects.
I strongly recommend going through a decluttering and clean-up process of your projects and materials. Bring yourself to a place of renewed readiness and give space to your creativity with a new mindset of what ‘finished’ means to you.

I’d LOVE to hear from you! How do you deal with your unfinished craft? Is there a specific reason you don’t finish your embroideries? Do you have And if you’ve followed the above steps let me know how you went. I read all my emails.
With love and creative freedom,
Kasia

As artists and crafters we are surrounded by unfinished projects. This is normal but we torture ourselves with the guilt and we dive into new projects to fix our previously perceived failures. I want to show you how you can effortlessly eliminate the disappointment and guilt which also serves as the thing that holds you back from creative freedom. It’s how I got through not only that IKEA box but have since cleared out every unfinished craft project. But not in the way you might think.
Firstly understand that our minds can’t leave open loops alone. By nature we are drawn to closure and results. Having open loops leaves us with anxious niggling thoughts at the back of our minds. And when we add a belief that we ‘should’ have done something then that niggling thought also turns into guilt.
Our guilt and anxiety are not there because the project is “unfinished” it’s because we’ve classified it as “unfinished” and thus a “failure”. We tell ourselves a failure story every time we see our bags of half-done craft, just like I did in that moment of seeing the contents of that box. The half-done craft, by itself, doesn’t mean anything. We are the ones that add the meaning to it. You might call yourself the “queen of unfinished craft projects” or you might say “I’m really good at starting but really bad at finishing my craft projects” but that’s just a chosen perception.
Our perception of what a “finished product” is, can often be a little harsh leaving us with guilt, disappointment and a sense of failure. We have expectations of our craft projects to be complete, all edges perfectly finished off and hanging on the wall, looking beautiful. When they’re not that we become self-critical. You do not have to be a victim of your own creative failure stories. You can choose to reclassify your craft projects and ‘finish’ them on your own terms. Here’s an easy exercise for a quick wrap up of what’s lurking in your cupboard (or under your bed):
Take out all your projects right now, lay them out on the floor or table and classify them using some examples below.
- These four are “experiments” and will be stitched together into a sampler.
- These two half-finished cushion embroideries served as colour tests and now I know that the brown and purple don’t go together. Before that I would not have known this. I can keep this as a reference check in my ‘experiments bag’.
- This large half-done wall-hanging is in a perfect state to donate to charity, I will pack it up together with the remaining colour threads and instructions and a short letter to the next person who will buy it.
- This table runner with Christmas designs can easily be unpicked and I will reuse it. I’ve changed my style since I started it two years ago and I no longer enjoy working in these colours and designs.
- Although I have not finished the entire design, this piece looks finished enough. I do not need to fill the rest of the fabric with 15 more flowers and leaves, the single flower in the centre is dramatic and I will use this as a small wall-hanging.
- This small strawberry design will be perfect for my niece to finish when she visits next. I will teach her how to do a simple back stitch and she can add the leaves finishing the piece and giving us both a sense of satisfaction. Plus it will be a joint project and she can keep it!
- This project no longer brings me joy, I feel ok about discarding it.
- I still love this and will finish it but I will change the design and colours slightly to make it feel like a renewed project.
- Add to sampler.
- Discard.
- Donate.
- Finish. (by delegating, renewing or deciding it’s done as it is!)
You see, you don’t need to go ahead and actually finish every single project that’s hidden under the bed, make it amazing, hang it on the wall, mount it on mahogany dowels. You don’t need to set aside days, weeks and months of work to finish every single project. This is YOUR creativity on YOUR terms and it should bring you joy. Living with hidden piles all over the house is not joy. This exercise is all about closing those open loops and laying your guilt and anxiety to rest. Creativity is a full process of experiments, changed minds, failures and successes. You choose what you call your projects and that shapes your mindset for your future projects.
Just be mindful; it’s not enough to give your projects names of “experiment”, “charity donation” and “sampler” and then put them all back into the dark cupboard! Haha! You do actually have to put them to use like in the examples above. It’s about moving your projects forward, creating momentum and not remaining in stasis. It’s also about being kind to yourself about how you judge your projects.
I strongly recommend going through a decluttering and clean-up process of your projects and materials. Bring yourself to a place of renewed readiness and give space to your creativity with a new mindset of what ‘finished’ means to you.
I’d LOVE to hear from you! How do you deal with your unfinished craft? Is there a specific reason you don’t finish your embroideries? Do you have And if you’ve followed the above steps let me know how you went. I read all my emails.
With love and creative freedom,
Kasia
Friday 9 October 2015
Table runner for Christmas
Here is the table runner that we're embroidering in the Saturday workshops between now and Christmas. I chose traditional reds and greens and the colours look great on the stark white Russian linen. Which by the way is stunning to work on. If you'd like to join one of the workshops in Lane Cove, check the details on the "Workshops" page and send me an email to join a class.


Sunday 20 September 2015
Colour play from the sketch book.
I want to share with you some colour sketches form my sketchbook. I always draw out a design and colour it before transferring it onto fabric. Usually I will play around with a few variations and colour combinations before picking up a needle and thread. Below is the original colour sketch and then the embroidery that was born from it and went onto a chair seat. And at the bottom are some current sketches with no embroideries made from them yet. If I use any of them for stitching I'll be sure to share the finished piece. I hope you find some inspiraiton here. Please send me any photos of sketches and embroidery if this is also your process. I would love to see!


Friday 21 August 2015
Polish folk art on Sydney streets.
Not so long ago I was comissioned for another public art work by the local council in the Lane Cove area where I live in Sydney. These are electricity boxes that you see by the road side. There are a lot of them around and many Sydney councils have been comissioning artists to paint these. It's wonderful to drive around Sydney and see these random artworks on the sides of roads. My design is heavily influenced by Polish folk art... pretty obvious! If you're in the area these boxes are located on the corner of Epping Rd and Centennial Ave in Lane Cove. Funny story with these was that when I was painting them someone called the police to say that I was vandalising public property! I spoke to the police and explained. No arrests were made and the officers both complimented me on the design. You can see more photos on my Instagram account.


Take a white vintage table cloth...
If you have any old table cloths at home that have maybe yellowed somewhat or are stained and you can't get the stains out, here is somehting you can do. I dyed this table cloth in green dye. This was originally white but had yellow stains on it that I couldnt get rid of. I hand drew the floral patterns on this and then chose orange and white as contrasting colours. I LOVE the result!


Australian Floral Emrboidery
I did these flowers a few months ago and recently took them out again. Now that the weather in Sydney is getting warmer I'm keen to go bush walking and see the stunning Australian wild flowers that are coming into bloom as we speak :)
This floral emboridery was inspired by Australian natives.


This floral emboridery was inspired by Australian natives.
Tuesday 15 April 2014
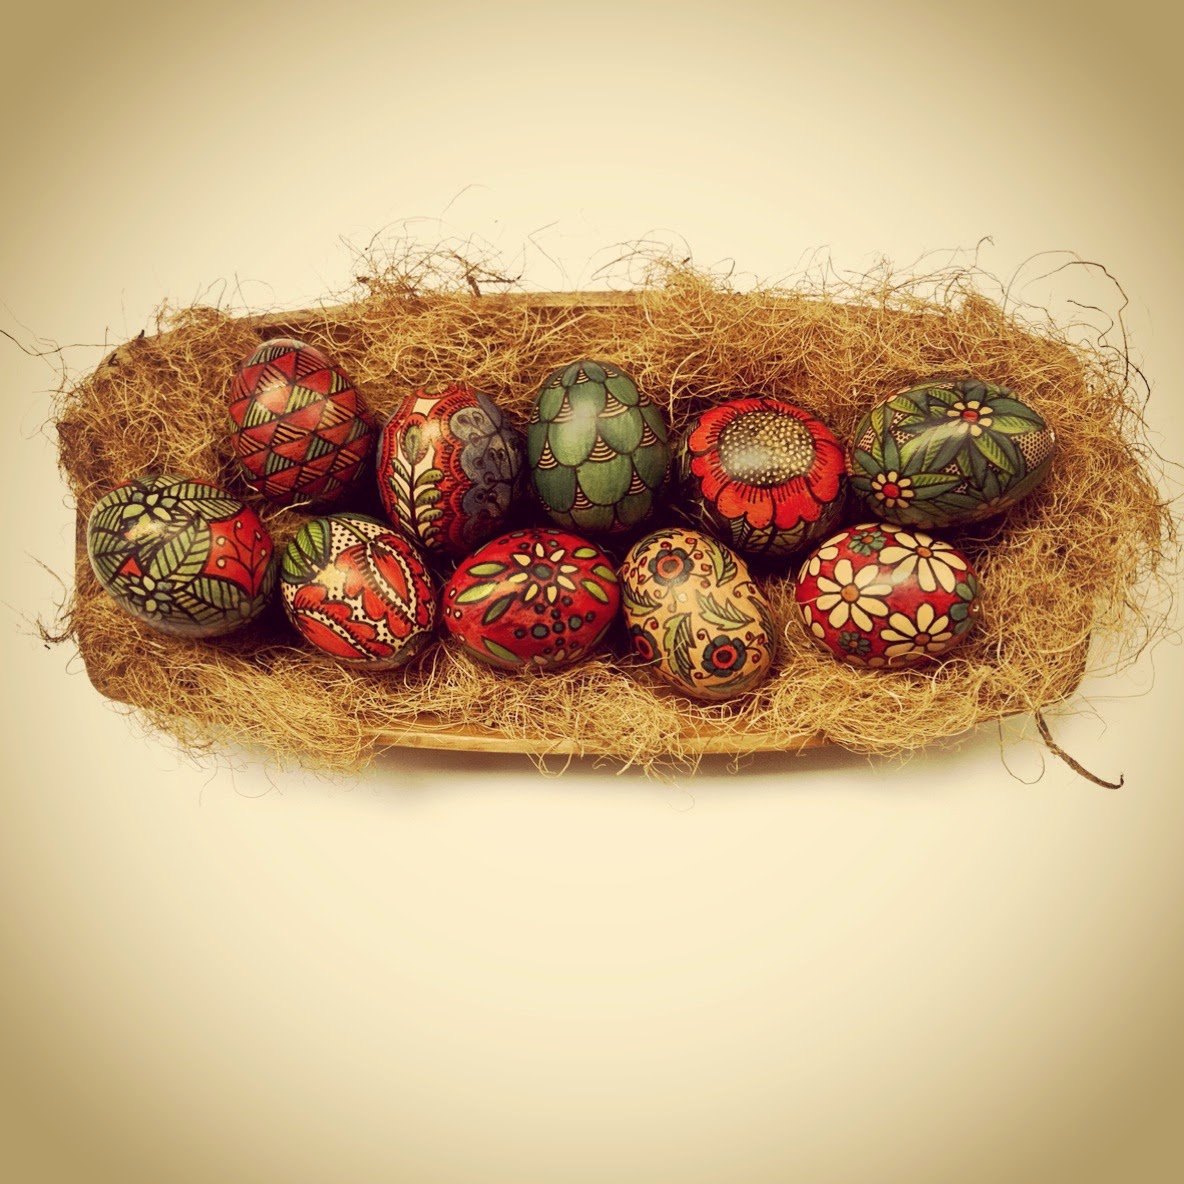
Painted Easter Eggs - 2014
Every year I greatly enjoy hand painting Easter eggs. I always use blown out chicken eggs, or goose eggs if I can get my hands on them. This year I used a variety of markers, permanent markers, fabric markers and Giotto pens (these go onto any surface and give a matt finish). Fabric markers are fun to use on egg shells because they are semi transparent and the colours can be blended softly. I used black permanent marker for all the outlines.
I was very happy with the results. But I'm even happier with how I photographed the eggs this year. I had these old pages from a calendar with vintage botanical drawings. I added a filter to the photos and am thrilled with the results. To me they look like little quirky artworks :)
Have a safe and joyful Easter everyone!
Sunday 13 April 2014
What you can expect from one of my workshops
Hello friends,

I've been running small embroidery workshops since last year. I enjoy them immensely and I am happy to say so do my students. I keep the class numbers small, never more than 6 people. This allows for plenty of one on one guidance and discussion. There is ample time for discussion, sharing of ideas and questions about projects that the students are keen to start at home after the class. The pace and atmosphere is relaxed and each student can work to their own pace. No one has to worry that they might be slower or less experienced than other students. I invite you to come along to one of my workshops in May, you will leave inspired and with an age old craft as a new skill.
I'd like to share with you a testimonial from Yumi who did one of my workshops last year and has not put down the embroidery needle and threads since then. I am SO happy to see her so inspired. The photo shows Yumi's current work in progress, she said she was inspired by the colour of the flowers (in the photo). How beautiful! The pattern being embroidered is from my limited edition prints.
"Hi Kasia, thank you for introducing me to the wonderful art of embroidery. The course was very enjoyable and it made me wish we could go back in time to a place where women used to sit and embroider for hours on end. It has been such a useful skill to have - I love that I can take my embroidery everywhere I go (even in the bath to relax!). You inspire me with your beautiful works, especially your floral motifs. I was very excited to see your new embroidery kits included some pretty floral designs. Thank you for sharing your gift with us and teaching us ever so patiently and always being so encouraging. Yumi xx"
To book in for the May workshops email me at kasiajtextiles@gmail.com or clik on this link for all the workshop details: http://us7.campaign-archive1.com/?u=8f802c1557284e520ba0e568e&id=7820b59afa
Learn authentic embroidery in a three hour workshop
You're invited to a relaxing embroidery workshop in the beautiful setting of One Village Shop in Lane Cove.
Learn the basics of hand embroidery in just three hours. We will be following a beautiful pattern in your choice of colour and you will leave with enough knowledge to continue at home, even teach your children or a friend. This workshop is suitable for absolute beginners or intermediates, the patterns provided can be worked in many different styles and I will guide you according to your ability. It's easy, relaxing and inspiring. I hope you can join me :)

DATES & TIMES: Sunday 4th May - 9:30am - 12:30pm
Sunday 4th May - 2:30pm - 5:30pm
Wednesday 21st May - 6:30pm- 9:30pm
LOCATION:
One Village Shop
12/105 Longueville Rd
Lane Cove 2066
At the end of Central Arcade on Longueville Rd
WHAT'S IN THE PRICE:
$79 per person
3 hours of tuition in a small group of maximum 5 people
45cm x 45cm linen pattern
2 colours of DMC embroidery floss
needle
wooden embroidery hoop
drawstring storage bag
instructions to keep and continue at home,k
BOOK YOUR SPOT:
Call: 0450 356 462 begin_of_the_skype_highlighting 0450 356 462 FREE end_of_the_skype_highlighting
or
Email: kasiajtextiles@gmail.com
There are a maximum of 5 places for each workshop.
CAN'T MAKE IT TO THE WORKSHOPS?
You can purchase my embroidery patterns with instructions in my Etsy shop.
Go to https://www.etsy.com/au/shop/KasiaJacquotShop?ref=search_shop_redirect
TO FORWARD THIS INFO TO A FRIEND:
Send this link: http://us7.campaign-archive1.com/?u=8f802c1557284e520ba0e568e&id=7820b59afa
If you have any questions or comments or would like to discuss doing an alternate project during the class please don't hesitate to get in touch, I'd love to hear from you :)
You can call me on 0450 356 462 begin_of_the_skype_highlighting0450 356 462 FREE end_of_the_skype_highlighting or email kasiajtextiles@gmail.com
Kasia Jacquot :)
Learn the basics of hand embroidery in just three hours. We will be following a beautiful pattern in your choice of colour and you will leave with enough knowledge to continue at home, even teach your children or a friend. This workshop is suitable for absolute beginners or intermediates, the patterns provided can be worked in many different styles and I will guide you according to your ability. It's easy, relaxing and inspiring. I hope you can join me :)
DATES & TIMES: Sunday 4th May - 9:30am - 12:30pm
Sunday 4th May - 2:30pm - 5:30pm
Wednesday 21st May - 6:30pm- 9:30pm
LOCATION:
One Village Shop
12/105 Longueville Rd
Lane Cove 2066
At the end of Central Arcade on Longueville Rd
WHAT'S IN THE PRICE:
$79 per person
3 hours of tuition in a small group of maximum 5 people
45cm x 45cm linen pattern
2 colours of DMC embroidery floss
needle
wooden embroidery hoop
drawstring storage bag
instructions to keep and continue at home,k
BOOK YOUR SPOT:
Call: 0450 356 462 begin_of_the_skype_highlighting
or
Email: kasiajtextiles@gmail.com
There are a maximum of 5 places for each workshop.
CAN'T MAKE IT TO THE WORKSHOPS?
You can purchase my embroidery patterns with instructions in my Etsy shop.
Go to https://www.etsy.com/au/shop/KasiaJacquotShop?ref=search_shop_redirect
TO FORWARD THIS INFO TO A FRIEND:
Send this link: http://us7.campaign-archive1.com/?u=8f802c1557284e520ba0e568e&id=7820b59afa
If you have any questions or comments or would like to discuss doing an alternate project during the class please don't hesitate to get in touch, I'd love to hear from you :)
You can call me on 0450 356 462 begin_of_the_skype_highlighting
Kasia Jacquot :)
Sunday 23 March 2014
Exquisite Korean embroidery
Recently I was given a rare opportunity to have a close look at the most exquisite Korean embroidery. My friend (and embroidery buddy) Yumi Wong-Pan let me borrow and take home six vintage silk wedding panels (yay! And eek!) The panels are about 70 years old and their luxurious feel and stunning thread work cannot be described in words nor can it be conveyed in the photos I took. The panels were approximately 1.2m long and 40cm wide. From what I could tell by looking at the work, most of the embroidery was done in single strand some details with 2 strands. It's not just the technical skill that is to be admired here but the colour choices and illustration are equally awe inspiring. The majority of stitches are sarin and stem stitch. The person who created these was evidently a very skilled needle worker as well as a highly talented artist. Yumi is planning to hand them to a museum. I am so grateful that I got the opportunity to handle these and examine them closely. I feel so inspired!
1.jpg)
2.jpg)
3.jpg)
4.jpg)
5.jpg)
6.jpg)
7.jpg)
8.jpg)
9.jpg)
10.jpg)
11.jpg)
12.jpg)
13.jpg)
14.jpg)
15.jpg)
16.jpg)
17.jpg)
18.jpg)
19.jpg)
20.jpg)
21.jpg)
22.jpg)
23.jpg)
24.jpg)
25.jpg)
26.jpg)
27_1.jpg)
28.jpg)
29.jpg)
31.jpg)
30.jpg)
33.jpg)
Detail of the back side of the flower pictured above.
Detail of the back side of the flower pictured above.
Subscribe to:
Posts (Atom)